ROBOGUARD SUPPORT

Programming Zones
Status Light Reset (Trouble light in older models)
Roboguard sends a status to the HQ once every 20 minutes. If a signal is not received by the HQ, the status light will come on. This does not necessarily mean there is anything wrong with your Roboguard
To reset the status light on your HQ:
- Press and release status button
- Switch off any zones now lit
- Press and release status button again
Tamper Light reset
When you remove the battery cover of a Roboguard, the Tamper light will come and on.
To reset the tamper light on your HQ:
- Press and release the tamper button
- Switch off any zones now lit
- Press and release tamper button again.
Programming in “A” Zones onto Roboguard
Have your HQ handy, and remove front cover of Roboguard you would like to program in
- On your HQ, press and HOLD the tamper button until the HQ beeps…then release
- Press the zone on the HQ you would like to program in,so light is on
- Then press the Tamper switch inside the Roboguard (silver tab bottom right of batteries)
- Roboguard will emit 4 beeps, and then 1sec later HQ will beep 10 times(means it has heard signal)
- Press any zone on HQ to stop lights flashing
- Switch on Zone and test
- If signal did not take, repeat steps above
Programming in “B” Zones onto Roboguard
Have your HQ handy, and remove front cover of Roboguard you would like to program in
- On your HQ, press and HOLD the Status button(trouble on older models) until the HQ beeps…then release
- Press the zone on the HQ you would like to program in,so light is on
- Then press the Tamper switch inside the Roboguard (silver tab bottom right of batteries)
- Roboguard will emit 4 beeps, and then 1 sec later HQ will beep 10 times(means it has heard signal)
- Press any zone on HQ to stop lights flashing
- Switch on Zone and test
- If signal did not take, repeat steps above
Deleting a Zone On The HQ
If you need to delete a zone, especially when a Roboguard has lost it’s programming or you would like to re-position them, then it is important you ensure that the zone is deleted before reprogramming again into “A” or “B” zones as per above.
“A” Zone deletion:
- On your HQ, press and HOLD the Tamper button until the HQ beeps…then release
- The HQ will light up zones currently programmed on HQ
- Press the Zone you would like to delete so it remains lit, (others if any will switch off)
- On your HQ press and release Status button(trouble on older models)
- HQ will beep 10 times to indicate that the zone has been deleted.
“B” Zone deletion:
- On your HQ, press and HOLD the Status button (trouble on older models) until the HQ beeps…then release
- The HQ will light up zones currently programmed on HQ
- Press the Zone you would like to delete so it remains lit, (othersif any will switch off)
- On your HQ press and release Status button again (trouble on older models)
- HQ will beep 10 times to indicate that the zone has been deleted
Deleting a Zone On The HQ
If you need to delete a zone, especially when a Roboguard has lost it’s programming or you would like to re-position them, then it is important you ensure that the zone is deleted before reprogramming again into “A” or “B” zones as per above.
“A” Zone deletion:
- On your HQ, press and HOLD the Tamper button until the HQ beeps…then release
- The HQ will light up zones currently programmed on HQ
- Press the Zone you would like to delete so it remains lit, (others if any will switch off)
- On your HQ press and release Status button(trouble on older models)
- HQ will beep 10 times to indicate that the zone has been deleted.
“B” Zone deletion:
- On your HQ, press and HOLD the Status button (trouble on older models) until the HQ beeps…then release
- The HQ will light up zones currently programmed on HQ
- Press the Zone you would like to delete so it remains lit, (othersif any will switch off)
- On your HQ press and release Status button again (trouble on older models)
- HQ will beep 10 times to indicate that the zone has been deleted
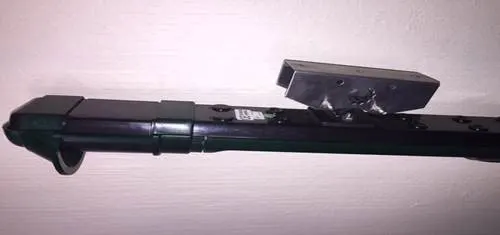
Installation Of Bracket
- Remove batteries
- Choose a suitable “ring” on the back of the Roboguard (normally one up from center) 2 outer rings cannot be used. Drill out with 5,5mm drill bit
- Place the “head” of the bolt inside the battery housing and secure it to bracket with the nut on the outside
- Replace batteries.
Warranties and Exclusions
-
Warranty Information On Your Equipment Supplied By Globalex
Your Roboguard equipment has a 12-month “carry-in” warranty if purchased as a DIY kit.
Should you experience any problems with your DIY kit the following options are available.- You may send the faulty equipment back to us for replacement/repair. (free courier service)
- You may call a technician to repair equipment on site (excludes labour charges).
- You can take the equipment to one of the Roboguard repair centres countrywide.(Excludes labour service)
- We will swop out equipment which has failed out of the box within a maximum of 7 days from date of despatch.
Exclusions:
- Batteries or damage caused by batteries
- Courier costs if any
- Call out charges
- Acts of God